Saturday, December 31, 2011

Hearty Chili

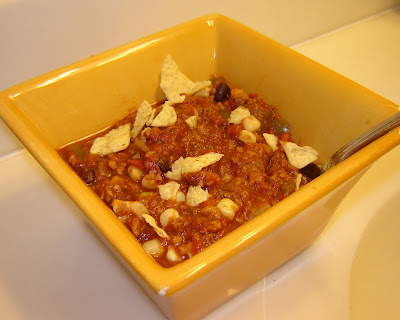
Even though it's a balmy 52 degrees outside, it's always nice to get cozy with a big bowl of warm chili.  I've made this Hearty Chili recipe a few times before and it never disappoints.  It's chock full of veggies, beans, and the secret ingredient: "soy crumbles."

Hearty Chili topped with crushed tortilla chips

Recipe:
Hearty Chili
  •  2 tablespoons olive oil
  • 1 onion, diced
  • 2 bay leaves
  • 1 teaspoon cumin
  • 2 tablespoons oregano
  • 1 tablespoon salt
  • 2 stalks celery, chopped
  • 2 green bell peppers, chopped
  • 2 jalapeno peppers, seeded and chopped
  • 3 cloves garlic, minced
  • 2 - 4 ounce cans chopped green chile peppers, drained
  • 2 - 12 ounce packages vegan burger crumbles (I use Lightlife Smart Ground veggie protein crumbles)
  • 3 - 28 ounce cans crushed tomatoes
  • 1/4 cup chili powder
  • 1 tablespoon black pepper
  • 1 - 15 ounce can kidney beans, drained and rinsed
  • 1 - 15 ounce can chickpeas, drained and rinsed
  • 1 - 15 ounce can black beans, drained and rinsed
  • 15 ounces frozen corn
First, heat the olive oil in a large pot over medium-high heat.  Add the onion, bay leaves, cumin, oregano, and salt.  Stir and cook the mixture until the onion becomes tender.  Next, mix in the celery, green bell peppers, jalapeno peppers, garlic, and green chiles.  Once the vegetables are heated through--after about 5 minutes--mix in the soy burger crumbles.  Reduce heat to low, cover the pot, and simmer for 5 minutes.  Then mix in the crushed tomatoes, chili powder, pepper, kidney beans, chickpeas, and black beans.  Bring the chili to a boil, reduce heat to low, and simmer for 50 minutes (at least), stirring in the corn when five minutes remain.  Serve hot.  I used crushed tortilla chips as a garnish.  

Yields 8 servings.

Comments:

Taste:
I could eat this chili every week.  Even though it's not very spicy, it's still packed with flavor.  The mixture of veggies, beans, and crumbles is also really filling.  Simon thinks the chili is "delightful," while Rachel likes that it's "really hearty."
Accessibility:  
Most of the ingredients in this recipe are both easy to find and affordable.  While my standard grocery store had the soy crumbles in stock, however, some grocery stores may not carry them.  Luckily, the chili would still be great without the crumbles. 
Ease of Preparation: 
The recipe is very easy to make.  Mixing ingredients into a pot isn't too taxing.  The recipe does take a while to make, though, between the chopping and simmering.  It's worth it, though! 
Non-vegan friendliness: 
Simon and Rachel loved the chili, and I'm confident that anyone else would feel the same way.  A dish like chili is extra vegan-friendly, though, because it's so customizable.  Your non-vegan friends and family members can add traditional chili toppings like cheese or sour cream if they so desire, while I topped mine with crushed up tortilla chips to add a little crunch.

Thursday, December 29, 2011

New Rating System

I'm introducing a new rating system in an effort to make my recipes easier to navigate.  Beginning today, I'm going to rate each new recipe in four categories:
  • Taste: How is the taste, texture, and overall eating experience?
  • Accessibility: How expensive is the dish?  Are the ingredients found everywhere or just in specialty grocery stores?
  • Ease of preparation: How long does the dish take to prepare?  How difficult is preparation? 
  • Non-vegan friendliness: Does this dish appeal to non-vegans?
My rating scale will range from one to four carrots, with one carrot being the worst and four carrots being the best:


So, for instance, a dish that tastes great, has inexpensive and easy-to-find ingredients, is easy to make, and attracts vegans and non-vegans, alike, would receive four carrots in each category--the highest rating. 

I hope this helps you choose which recipes you'd like to try out!  Please let me know if there's anything else I can do to improve my blog or make my recipes clearer. 

Almond Joy Cupcakes


Whenever someone finds out that I'm vegan, the conversation frequently includes an exchange that goes something like this:
"Yup, I'm vegan."
"Wow!  I could never be vegan.  I could be vegetarian, but I just couldn't give up [names favorite food item].  Don't you miss it?"
Actually, there are very few non-vegan foods that I miss.  I was never a big steak-eater; I'm completely satisfied with coconut milk-based ice cream instead of cow's milk-based ice cream; I have always enjoyed non-vegan foods such as beans, nuts and vegetables; and so on.  However, even though I don't crave non-vegan foods, I still enjoy many of the flavor combinations that are featured in non-vegan foods.  Hey, just because I don't eat most candy bars doesn't mean I have to give up the combination of coconut, chocolate, and almond!  So, today I made Almond Joy Cupcakes.

Almond Joy Cupcakes: Chocolate-Almond cake with Coconut Icing

Recipe:
Almond Joy Cupcakes


Chocolate-Almond Cake:
  • 2 cups flour
  • 2 cups granulated sugar
  • 1 cup cocoa powder
  • 1.5 teaspoons baking soda
  • 1 teaspoon baking powder
  • 1 teaspoon salt
  • 1 cup almond milk or soymilk 
  • 1/2 cup canola oil
  • 2 tablespoons white or apple cider vinegar
  • 1 teaspoon vanilla extract
  • 1 teaspoon almond extract
  • 2 teaspoons espresso powder or 1 tablespoon instant coffee
  • 1/2 cup boiling water
  • 1 cup chocolate chips

Coconut Icing:
  • 2 - 8 ounce packages of Tofutti Better than Cream Cheese (or another non-dairy cream cheese)
  • 1 cup vegan butter
  • 2 cups powdered sugar
  • 1 teaspoon vanilla extract
  • 1 teaspoon coconut flavoring/extract
  • 2 cups sweetened coconut flakes

First, preheat the oven to 350 degrees Fahrenheit.  Line cupcake pans with 24 baking cups and set aside.


Next, prepare the cake:  mix together the first six cake ingredients in a large bowl and set aside.  In a small bowl, whisk together the soy/almond milk, oil, vinegar, vanilla, and almond extract.  Stir the wet ingredients into the dry ingredients until just combined.  In a separated small bowl, dissolve the espresso powder into the boiling water and immediately fold into the batter.  (The batter will be thin.)  Distribute the batter evenly into the baking cups--I started out with about 1/4 cup batter in each cup.  Finally, sprinkle some chocolate chips into each baking cup.  Bake for about 18 minutes, or until a toothpick inserted into the center of a cupcake comes out clean.  Cool completely on a wire rack before frosting.

Meanwhile, prepare the icing.  Beat the non-dairy cream cheese and vegan butter until smooth using an electric mixer.  Then gradually mix in the powdered sugar and beat for about 3 minutes until smooth and creamy.  Add the vanilla and coconut flavoring and beat another 30 seconds.  Mix in the coconut by hand.


Top the cooled cupcakes with icing, and feel free to garnish with chocolate chips or almonds.

Comments:

Taste:
These cupcakes are really good, though they aren't an exact replica of an Almond Joy candy bar.  The chocolate almond in the cake goes nicely with the icing, but the additional cream cheese flavor adds a little something extra.  If you don't want the cream cheese flavor and are looking for a more traditional taste, feel free to remove the cream cheese and add more of the butter and powdered sugar. 
Accessibility: 
The low accessibility rating comes from the fact that vegan cream cheese may be hard to find in some locations.
Ease of Preparation: 
This is a pretty standard, simple cupcake recipe. 
Non-vegan friendliness: 
My family liked the cupcakes, but they weren't blown away.  I still have some tweaking to do!

You can also use this recipe to make a cake rather than cupcakes: just increase the baking time and use two 8-inch baking pans.

Wednesday, December 21, 2011

Curried Carrot Dip

Tonight was carrot night.  Simon and I made a carrot-ginger soup and a carrot dip.  The dip was much better than the soup, in my opinion, so I'm just going to include the recipe for the Curried Carrot Dip here.

Recipe:
Curried Carrot Dip

  • 1 pound carrots, washed and cut into 1/2-inch chunks
  • 1/4 cup roasted walnuts
  • 2 teaspoons olive oil
  • 1 garlic clove
  • 1 teaspoon curry powder
  • 1/2 teaspoon cumin
  • 1/4 teaspoon salt
  • 1 tablespoon lemon juice

First, bring a small saucepan of water to a boil.  Boil the carrots for about 10 minutes, or until soft.  Drain.

Next, blend the walnuts in a food processor until crumbs form.  Add all other ingredients and process until smooth.  You may have to process in batches.

Refrigerate before eating to cool off the dip.  Serve chilled with toasted bread, pita, or crackers.

Comments:
The ingredients come together into a pretty smooth, substantial, and satisfying dip.  The curry flavor isn't overpowering; instead, it adds just the right amount of spice.  And hey, there's even a little protein in there from the walnuts. 

I could see this dip being very good with a little honey added for sweetness, or a little cumin added for additional spice.  Next time, I might try one of these variations. 

Tuesday, December 20, 2011

Chocolate Fudge and Caramel Corn

Another item on my to-do list this week: make candy to bring in to my office as a holiday treat.  Check!  Simon and I made two very easy recipes, Chocolate Fudge and Caramel Corn.  This was my first time making the fudge, but I made the caramel corn once over the summer for my extended family's week at the beach.  Everyone loved the caramel corn before and fudge is pretty hard to dislike, so I'm hopeful that each treat will both go over well at the office.

Cooling Caramel Corn
Chunks of Fudge

Recipe:
Chocolate Fudge

  • 1 - 12 ounce bag Ghirardelli semi-sweet chocolate chips or a bar of dark chocolate
  •  6 tablespoons vegan butter
  • 3.5 cups powdered sugar
  • 1/2 cup cocoa powder
  • 1 teaspoon vanilla extract
  • 1/4 cup soymilk

First, lightly grease an 8-inch square baking pan with vegan butter.  Set aside.

Place all of the ingredients in a double boiler.  Stir occasionally until the mixture melts together and becomes smooth.   Pour the mixture into the baking pan, cover, and chill for at least 3 hours before cutting into squares. 


Recipe:
Caramel Corn

  • 14 cups popped popcorn
  • 1 cup dry roasted peanuts (optional)
  • 1 cup packed dark brown sugar
  • 1/4 cup light corn syrup
  • 1/2 cup vegan butter
  • 1/2 teaspoon salt
  • 1/4 teaspoon baking soda
  • 1/2 teaspoon vanilla extract

First, lightly grease a shallow baking pan, such as a roasting pan, a jellyroll pan, or a high-sided cookie sheet.  Place the popped popcorn in the pan, spread the peanuts evenly over top, and set aside.  

Preheat the oven to 250 degrees Fahrenheit.  Combine the brown sugar, corn syrup, butter, and salt in a saucepan and bring to a boil over medium heat, stirring enough to blend.  Once the mixture begins to boil, boil for five minutes, stirring constantly.  Remove from the heat and stir in the baking soda and vanilla.  The mixture should turn light and foamy.  Immediately pour the caramel sauce over the popcorn and stir to coat.  (Don't worry about coating every inch of the popcorn at this time.)

Bake the caramel corn for 1 hour, stirring the mixture every 15 minutes.  Then, cover the counter with wax paper and dump the popcorn onto it, separating chunks of caramel corn.  Allow the corn to cool completely and store in an airtight container. 

Comments:
Both of these recipes are great.  I tagged them as both "quick and easy" and "advanced preparation required" because they're quick to prepare but both involve some extended down-time.

Fudge variations:  Add one or two tablespoons of peanut butter to make it peanut butter fudge!  Or, add 1 cup chopped nuts to make nutty chocolate fudge.

Monday, December 19, 2011

Fajitas and Chunky Guacamole

The countdown to "winter break" has begun!  I only have three more days of work and three more dinners with Simon and Rachel before I head home for a little over a week to spend time with my family.  As a result, this week is officially Use-Up-Things-In-The-Kitchen Week.  Despite this restriction, tonight's dinner set a tasty tone for the short week.

Rachel, Simon, and I made Chunky Guacamole and Fajitas tonight in order to use up the corn tortillas we bought for our Potato and Kale Enchiladas.  Observe: 

Chunky Guacamole
Fajita Filling
Dinner!

Recipe:
Chunky Guacamole

  • 2 avocados
  • 1/2 tablespoon lime juice
  • 1 tomato, diced
  • 1/2 medium onion, diced finely
  • 1/2 teaspoon salt
  • 1/4 teaspoon pepper

Slice the avocados vertically.  Remove the pit and scoop out the avocado into a bowl.  Mash up the avocado a bit, leaving some chunks.  Then add the remaining ingredients, stir, and enjoy with tortilla chips...or atop fajitas! 

Recipe:
Fajitas

  • 2 tablespoons olive oil
  • 1.5 green bell peppers, seeded and sliced into strips
  • 1.5 onions, diced
  • 1 teaspoon salt
  • 1/2 teaspoon black pepper
  •  2 - 15.5 ounce cans black beans, drained and rinsed
  • 1.5 cups frozen corn
  • 1 teaspoon crushed red pepper flakes
  • 1 teaspoon chili powder
  • corn or flour tortillas
  • toppings of your choice

First, heat the olive oil in a large frying pan over medium-high heat.  Add the onion, bell pepper, salt, and pepper and sauté until the onions begin to look golden and the peppers are tender.  Add the beans, corn, and spices and heat until warm.  Serve over tortillas and top with any fajita toppings you like, such as tomatoes, onions, salsa, or guacamole.

Comments:
Both of these recipes are really quick and easy to make.  I've made this guacamole many times before and it's always a hit.  The fajitas are a great non-vegan-friendly dish because they're so customizable--Simon and Rachel both put shredded cheese on theirs. 

Teaser for Wednesday's dinner: The ingredient to be used up is carrots!

Wednesday, December 14, 2011

Potato and Kale Enchiladas

Tonight I made a delicious and nutritious (yet labor-intensive) recipe from Veganomicon: Potato and Kale Enchiladas with Roasted Chile Sauce.  I've made this recipe several times before with friends in college and with my family at home, but this was my first time making it on my own.  I don't know that I've ever had non-vegan enchiladas, but I do know that these vegan ones are pretty darn good.   

 Here are all 12 enchiladas in the pan.
And here's my individual serving with extra sauce on top!

Here's the recipe with a few of my own alterations. 

Recipe:
Potato and Kale Enchiladas

  • 5 tablespoons olive oil (2 tablespoons for the sauce and 3 tablespoons for the filling)
  • 1 onion, diced
  • 3 large green chiles, roasted, seeded, and chopped coarsely (click here for information on roasting peppers)--or, use a 4 oz can of green roasted chilies
  • 2 teaspoons chile powder
  • 2 teaspoons cumin (1.5 teaspoons for the sauce and .5 teaspoons for the filling)
  • 1 teaspoon marjoram
  • 1 - 28 ounce can fire-roasted diced tomatoes
  • 1 teaspoon sugar
  • 1 tablespoon salt (1.5 teaspoons for the sauce and 1.5 teaspoons for the filling)
  • 1 pound potatoes, peeled and diced
  • 1/2 pound kale, washed and chopped finely
  • 4 cloves garlic, minced
  • 1/4 cup vegetable broth or water
  • 3 tablespoons lime juice
  • 12 small, soft corn tortillas

Preheat the oven to 375 degrees Fahrenheit.  You'll need a large casserole dish or a 13x9-inch baking pan.

First, prepare the roasted chile sauce.  Heat 2 tablespoons of olive oil in a medium saucepan over medium heat.  Add the onion and sauté until golden.  Stir in the roasted chiles, chile powder, 1.5 teaspoons cumin, marjoram, diced tomatoes, sugar, and 1.5 teaspoons salt; bring the mixture to a simmer and then remove it from the heat.  Finally, purée the sauce in a food processor or blender until smooth.  Set aside.


Next, prepare the filling.  Add the prepared potatoes to a saucepan and cover with water.  Bring to a boil and cook until the potatoes are tender (about 15-20 minutes).  Drain the potatoes and set aside.  Add 3 tablespoons olive oil and the garlic to another saucepan and heat over medium-low heat stirring frequently until the garlic is slightly brown.  Add the kale, sprinkle a pinch of salt over top, raise the heat to medium, and stir the mixture until the kale is coated with the oil and garlic.  Partially cover the pot to steam the kale until it is wilted.  Remove the lid and add the potatoes, vegetable broth, lime juice, and salt.  Cook another few minutes until the liquid is absorbed and set aside.  


Finally, assemble the enchiladas in an assembly line.  Have ready a shallow dish filled with about 3/4 cup chile sauce, a casserole dish or baking pan, the corn tortillas, and the potato and kale filling.  Spread about 1/3 cup enchilada sauce over the bottom of the casserole dish/baking pan.  Take a corn tortilla, dunk it into the shallow dish filled with sauce, and cover both sides of the tortilla with sauce.  Then, add the potato filling to the tortilla, roll up the tortilla, and place it in the baking dish.  Repeat these steps with the rest of the tortillas, making sure the tortillas are pretty tightly packed in the baking dish.  Once the dish is filled, pour about a cup of sauce over the top (there should be some sauce left over) and cover the dish tightly with aluminum foil.  Bake for 25 minutes.  Remove the foil and bake for another 10-15 minutes to get the tortillas a bit crispy.  Remove the pan from the oven and celebrate!  You can now enjoy the fruits of your labor.  Top each serving with extra sauce and enjoy. 

Comments:
As I insinuated above, this recipe takes a very long time to make.  From boiling the potatoes and roasting the chiles to making the filling and sauce to baking the enchiladas, it's a lengthy process.  This is probably a better weekend meal for that reason.

Nonetheless, these enchiladas are superb.  The roasted tomatoes and chiles add a great smoky flavor to the dish, while baking the enchiladas results in a combination of crispy and smooth textures.  Simon thought the enchiladas were good, but he wished there were more sauce inside the them (rather than on top).  Rachel said that her first thought upon tasting the enchiladas was, "I wish I could have more."  How's that for an endorsement? 

Monday, December 12, 2011

Moroccan Israeli Couscous

Last night Simon and I tried out a new recipe for Moroccan Israeli Couscous to use up some of our couscous.  I was intrigued by this recipe because it includes several vegetables that I don't usually eat.  Plus, I'm warming myself up to Israeli couscous:  I usually prefer Moroccan couscous (the smaller variety) to Israeli couscous (the larger variety) since my primary experience with the latter is in mediocre dining hall dishes.  This recipe for Moroccan Israeli Couscous combines Moroccan flavors with Israeli-sized couscous.   


As you can see, the end product looks pretty good! 

Recipe:
Moroccan Israeli Couscous

  • 1 tablespoon olive oil
  • 1 onion, diced
  • 3 cups low-sodium vegetable broth
  • 2 carrots, julienned
  • 2 turnips, peeled and julienned
  • 1 sweet potato, julienned
  • 1/2 pound frozen peas
  • 1 red bell pepper, julienned
  • 1 - 15 ounce can chickpeas, drained and rinsed
  • 1 - 15 ounce can tomato sauce
  • 1/4 teaspoon ground cinnamon
  • 1/2 teaspoon ground turmeric
  • 1 pinch saffron
  • 1 pinch curry powder
  • 2 cups Israeli couscous, prepared according to package directions

First, heat the oil in a large saucepan or stockpot over medium-high heat.  Add the onion and sauté until golden.  Pour in the vegetable broth and bring to a boil.  Then stir in the carrots, turnips, and sweet potato, reduce the heat to medium, and simmer (uncovered) for 15 minutes.  Next, reduce the heat to low, add the peas and bell pepper, and simmer (covered) for 20 minutes.  Finally, stir in the chickpeas, tomato sauce, and spices and simmer until the mixture is heated through.  

Serve over Israeli couscous prepared according to the package directions.   

Comments:
While I did enjoy the texture and mouthfeel of the couscous,  I didn't love this recipe.  To me, it was a bit bland.  The flavors were nice but they weren't very strong.  I decided to doctor the final product by adding a bit of salt and crushed red pepper flakes, though, and these two small additions made a big difference.

Simon generally agreed with me and wasn't thrilled with the original recipe.  On the other hand, Rachel liked both the texture and the taste of the couscous.  She also thought the dish was visually appealing, due to the differently prepared vegetables and the varied colors.  As Rachel said, "I'd eat that again."  (And she did--well, we all did--for dinner tonight!)

Sunday, December 11, 2011

Gingerbread Cookies

Last night I had a hankering for something sweet.  I decided to try out a new gingerbread cookie recipe despite Simon's objections (he doesn't particularly like gingerbread).  It was a good move.  These seasonal cookies hit the spot.


Just keep in mind before you begin making these cookies that they require some extra time for chilling the dough!  

Recipe:
Gingerbread Cookies


  • 3 cups all-purpose flour
  • 1/4 teaspoon salt
  • 2 teaspoons baking soda
  • 2 teaspoons ground ginger
  • 1 teaspoon ground cinnamon
  • 1/4 teaspoon ground nutmeg
  • 1/4 teaspoon ground cloves
  • 1/2 cup vegan butter
  • 3/4 cup sugar (+ about 1/4 cup extra sugar to coat the cookies at the end)
  • 1.5 teaspoons Ener-G Egg Replacer powder (or another equivalent of 1 egg)
  • 2/3 cup molasses

First, whisk together the flour, salt, baking soda, and spices in a small/medium bowl.  Set aside.  In a separate bowl, use an electric mixer to cream together the butter and sugar until light and fluffy (this could take about 3 or 4 minutes).  Add the egg replacer powder and molasses to the mixture and beat until combined.  Then add the flour mixture in a couple batches, beating until smooth.  Only if needed, add 1 or 2 tablespoons of water to get the right cookie-dough consistency.
Once your dough is prepared, divide the dough in half, wrap each chunk in plastic wrap, and refrigerate for at least 1 hour or overnight.
When you're ready to begin baking the cookies, preheat the oven to 350 degrees Fahrenheit and line 3 baking sheets with parchment paper.  Next, add the extra 1/4 cup sugar to a separate small bowl.  Roll the dough into 1-inch balls and roll each ball in the sugar until coated. Place the cookies on the cookie sheets and bake for about 12 minutes. 

Comments:
These cookies are not ginger snaps; they're chewy gingerbread cookies.  I like that, and apparently Simon did too since he had seconds and thirds.  As my dad always says, cookies are meant to be eaten three at a time!

These gingerbread cookies can be sugar-coated, as I included in the recipe above, or they could be iced with vegan royal icing (icing that dries to a smooth, hard, matte finish) or rolled out and cut into gingerbread shapes.  The possibilities are endless!  Have fun with these cookies.

I'm going to make my vegan brownies for a holiday party this evening--I've already blogged about those, so here's the recipe: Fudgy Brownies.

Wednesday, December 7, 2011

Sweet and Savory Pineapple Cashew Stir-Fry

Tonight Rachel and I made a delicious meal of Sweet and Savory Pineapple Cashew Stir-Fry.  This one-pot meal is one of the tastiest recipes I've posted so far, in my opinion.


The stir fry is made up of so many components.  While it may look like a jumbled mess in the picture, all of the ingredients come together into a delightful medley. 

Recipe:
Sweet and Savory Pineapple Cashew Stir-Fry

  • 1 cup quinoa, rinsed
  • 1 cup pineapple juice
  • 1 cup water
  • 1/4 teaspoon soy sauce
  • 3 tablespoons peanut oil (or another vegetable oil if you don't have peanut oil)
  • 2 scallions, thinly sliced
  • 2 cloves garlic, minced
  • 1 jalapeno, seeded and minced
  • 1/2-inch piece ginger, peeled and minced
  • 1 red bell pepper, seeded and diced
  • 1 cup frozen peas
  • 1/2 cup fresh basil leaves, chopped
  • 2 tablespoons fresh mint leaves, chopped
  • 2 cups fresh pineapple, cut into bite-sized chunks
  • 4 ounces raw cashews, toasted in a dry skillet over medium heat until golden (or use pre-roasted cashews)
  • 1/4 cup soy sauce
  • 3 tablespoons vegetable stock

First, prepare the quinoa.  Combine the first four ingredients in a medium-sized pot, cover, and bring to a boil over high heat.  Once boiling, stir, lower the heat to medium-low, cover, and cook for about 14 minutes (or until the liquid has been absorbed and the quinoa has become plump).  Remove from heat, uncover, fluff the quinoa with a fork, and place in the refrigerator until ready to use.
Next, prepare the stir-fry.  You'll need a large skillet or wok for this since there's a lot to stir-fry!  Add the peanut oil, scallion, and garlic to the skillet and heat over medium heat.  Once you hear sizzling, add the jalapeno and ginger and continue cooking for about 2 minutes.  Then add the bell pepper and peas.  Stir-fry for another 4 or so minutes.  Once the peas look bright green, stir in the basil and mint, cook for another minute, and add the pineapple chunks, prepared quinoa, and cashews.  Combine the mixture--it will be pretty thick at this point.  Then, drizzle the remaining soy sauce and vegetable stock over the mixture and stir well.  Stir-fry for another 8-10 minutes and serve hot. 

Comments:
This stir-fry is excellent.  As Simon said, the combination of the sweet and savory is delicious.  He also commented that the pineapple adds a distinctive texture that you can't find in many other dishes.  While Simon and I both enjoyed the crunchy cashews, they were Rachel's least favorite part of the dish.  Nonetheless, she really liked the combinations of flavors and the overall dish.

This recipe looks a little overwhelming due to the long ingredient list, but it's very manageable to make if you prepare all of the ingredients before you start cooking.  To save time you can also make the quinoa in advance and store it in an air-tight container in the refrigerator until you are ready to use it.     

I highly recommend that you try this recipe!

Monday, December 5, 2011

Sweet Potato Peanut Soup

Tonight Rachel and I made African-inspired Sweet Potato Peanut Soup:


So much carotene!!  This spiced soup is chock full of vegetables and is really a meal in itself.  It was pretty easy to make, although we had a couple mishaps--I'll help you avoid those with a couple tips in the recipe: 

Recipe:
Sweet Potato Peanut Soup

  • 1 tablespoon vegetable oil
  • 1 large onion, chopped
  • 2 cloves garlic, minced
  • 4 teaspoons curry powder
  • 1 teaspoon cayenne pepper
  • 1.5 pounds sweet potatoes, chopped
  • 3 celery stalks, chopped
  • 3 carrots, chopped
  • 1 14.5 oz can diced tomatoes
  • 5 cups water
  • 3 teaspoons pepper
  • 3 tablespoons natural peanut butter
  • peanuts, chopped, for garnish
  • cilantro, chopped, for garnish

First, chop all of the vegetables so they're ready to go.  (It's generally a good practice when cooking to have everything ready to go before starting.)  Once everything is ready, heat oil and garlic in a soup pot over medium-high heat and add the onions once it's hot.  Cook for about 5 minutes until the onions become translucent and tender.  Add the curry powder and cayenne and cook for another minute or two.  Next, add the sweet potatoes, celery, carrots, tomatoes, and water to the pot.  The water should more than cover the vegetables.  Bring to a boil and boil for about 20 minutes.  You know the soup is ready when the vegetables are tender and easily poked with a fork. 

Once the soup is cooked, blend the soup, pepper, and peanut butter together in a food processor.  Here's where I struggled!  Make sure you don't over-fill the food processor.  You'll probably need to blend the soup in batches, so make sure you divide the pepper and peanut butter between the batches.  The soup leaked/exploded out of the food processor when I blended it, causing the clean-up process to take much longer than necessary.  Once the soup is thoroughly blended together, garnish with chopped cilantro and crushed peanuts and enjoy! 

Comments:
This soup had an excellent flavor.  That said, Rachel and I both agree that the texture of the soup wasn't perfect this first time around.  The blending fiasco led me to under-blend the soup, meaning it was a little too chunky rather than more puréed.  I also think there was too much broth in the soup (I adjusted the recipe above to make up for that).  All in all, I liked the soup: it was a substantial and nutritious meal with a great spiced, nutty flavor.  Hopefully I'll learn from my mistakes this time around and it will be even better next time.    

Now it's time to eat some of those Christmas cookies...

Sunday, December 4, 2011

Peanut Butter Blossoms

This is truly the most wonderful time of the year.  Last weekend was Thanksgiving and this weekend was my extended family's annual Christmas cookie bake.  Nine of us gathered together to bake and exchange lots of cookies.  We made around 13 different varieties of cookies and other treats between the nine of us (plus 2 dogs and 3 young kids)--all in one kitchen.  What could be better?

I'm the only vegan in my extended family, as I've mentioned before, so my cookies were definitely meant to please non-vegan palates.  Happily, my mom, my sister, and one of my aunts also made some vegan treats.  All in all, the vegan options included chocolate-mint brownie bars, peanut butter crispies, oatmeal chocolate chip cookies, and my peanut butter blossoms.  Looks like I have some serious eating to do over the next couple days.   

I'm going to share with you the recipe for my peanut butter blossoms:


First I'll include the recipe for the vegan chocolate kisses and then I'll list how to make the cookies.

Recipe:
Chocolate Kisses

  • 5 or 6 oz. of vegan chocolate chips (I used half of a 12oz. package of Ghirardelli semi-sweet chips)
  • Parchment Paper and a plastic bag for piping. 

First, melt 3/4 of the chocolate chips on the stove using a double boiler:  Fill a medium saucepan with about 2 or 3 inches of water and heat.  Melt the chocolate chips in a smaller saucepan nested in the larger saucepan, stirring frequently to prevent burning.  Once the chocolate is melted, remove from heat, add in the remaining chocolate, and stir until all of the chocolate is melted and combined.  Then, add the chocolate to a piping bag (fill a plastic bag with the chocolate and cut a small hole in the bottom of the bag) and pipe the chocolate onto parchment paper into the shape of a chocolate kiss.  Pipe in a circular motion, slowly lifting up as you go to create the shape.  Let the kisses harden.  Yields approximately 24-30 kisses. 

Recipe:
Peanut Butter Blossoms

  • 24 vegan chocolate chocolate kisses (recipe above)
  • 1/2 cup brown sugar
  • 1/2 cup sugar (+ 3 tablespoons extra sugar to coat the cookies at the end)
  • 1/2 cup vegan margarine
  • 2 egg equivalents (I used Ener-G Egg replacer powder, but you could also use 1/3 cup applesauce)
  • 1 teaspoon vanilla
  • 1 teaspoon baking soda
  • 1/2 cup natural peanut butter
  • 1 3/4 cups flour

Once the chocolate kisses are cooling on the parchment paper, preheat the oven to 350 degrees Fahrenheit.  Cream the sugars and margarine in a mixing bowl until well combined.  Add in the egg equivalent, vanilla, baking soda, and peanut butter and mix well.  Finally, add in the flour and combine until a soft dough forms.

Next, add the extra 3 tablespoons sugar to a separate small bowl.  Roll the dough into 1-inch balls and roll each ball in the sugar until coated. Place the balls on a lightly greased cookie sheet and bake for 9-12 minutes.  Immediately after removing the cookies from the oven, top the cookies with your chocolate kisses.  Press the kisses into the cookie and allow the cookies to cool.  The kisses will attach themselves to the cookie during the cooling process. 

Comments:
Despite the fact that it was my first time making  my own chocolate kisses, the kisses came out well and looked great in the center of the peanut butter cookies.  They weren't quite as pointy as Hershey kisses, but the homemade look is nice too.

The only issue I had with this recipe was that my cookie dough was a bit sticky when I was attempting to roll it into balls.  I adjusted the flour in the recipe above to make up for that; but, if your dough is still sticky, try refrigerating the dough for about an hour to reduce the stickiness. 

All in all, these cookies tasted just like I remember peanut butter blossoms tasting.  Enjoy this classic, now vegan, cookie!

Tuesday, November 29, 2011

Butternut Squash Saag

Rachel and I made Butternut Squash Saag tonight--an Indian inspired dish.  Again, it's great to have something spiced and warm to eat on a cold, rainy day.  You could also use pumpkin or some other squash in this recipe, depending on your preferences.   

I've decided to start incorporating pictures into my blog, so here's the final product!


I'll have to keep working on my food photography since food is notoriously difficult to capture on camera; but, I think this picture captures the beautiful colors in the dish quite nicely! 

Recipe:
Butternut Squash Saag

  • 1 butternut squash
  • 3 tablespoons vegetable oil or peanut oil
  • 1 large onion, diced finely
  • 4 cloves garlic, minced
  • 1.5 teaspoons garam masala (if you don't have this, mix together cumin, coriander, cardamom, pepper, cloves, and nutmeg--this will come close!)
  • 1/4 teaspoon ground cinnamon
  • 1/2 teaspoon salt
  • 1/8 teaspoon cayenne pepper
  • 1 cup water
  • 1-inch cube fresh ginger, peeled and minced finely
  • 10 ounces fresh spinach (approximately 2 bunches), washed and chopped coarsely
  • juice of 1/2 lime

First, prepare the squash.  Preheat the oven to 350 degrees Fahrenheit.  Using a strong knife and a careful hand, cut the squash in half lengthwise.  Remove the seeds and seed-goo with a spoon.  Place the squash cut side down in a baking dish and fill the dish with about an inch of water.  Bake for 45 minutes, until you can easily insert a fork into the flesh.  Once the squash is baked, let it cool completely before peeling away the skin and chopping it into 1-inch chunks.
Next, move on the the rest of the dish.  Heat the oil in a large saucepan over medium-high heat.  Add the onions and sauté for about 5 minutes.  Add the garlic and sauté for a couple more minutes until everything is lightly brown.  Add the squash and continue cooking for a few minutes until the mixture is heated through.  Add the spices, salt, and ginger.  Stir the mixture and add the water.  Continue cooking for about 5 minutes, stirring frequently.  You can mush up the squash a bit if you'd like smaller pieces, but do leave some pieces chunky.  Add the spinach in batches, stirring well between additions.  Cook for about 10 more minutes, stirring frequently.  Add the lime juice, and enjoy! 

Comments:
I had never had Butternut Squash Saag before, but it was worth the try!  The dish wasn't spicy (though you could add more cayenne to change this); instead, it was pleasantly spiced and gave off a nice aroma.  Plus, as I mentioned before, the colors were great.  This dish appeals to many senses!  We didn't serve the saag over rice, though you could do so to add more bulk.

Rachel was also pleasantly surprised by the saag.  She thought the flavor combination was unexpected and unlike other dishes she has had in the past.  She (and I) thought we could've cooked the squash a bit longer, but that is easily remedied.

Time-saving note: I cooked the squash one day in advance to avoid a really extended prep time tonight, and I think that was a great move.  If you decide to cook the squash in advance, just make sure you let it cool, cover it in plastic wrap or put it in a sealed container, and refrigerate it.

Sunday, November 27, 2011

Saucy Chickpeas

Tonight I made a recipe that is new to this blog but not to our apartment.  We made these saucy chickpeas once before; we liked them enough to make them again!  The recipe is a Mediterranean blend of chickpeas and sauce that can be served with rice and vegetables.   

Recipe:
Saucy Chickpeas

  • 1/2 cup slivered almonds
  • 1 - 28oz. can diced tomatoes
  • 2 red peppers
  • 4 tablespoons olive oil
  • 3 cloves garlic
  • 2 shallots, minced
  • 1 jalapeno pepper, seeded and minced
  • 1/4 cup vegetable broth
  • 2 teaspoons balsamic vinegar
  • 2 teaspoons sugar
  • 1 teaspoon ground thyme
  • 1/2 teaspoon dried rosemary
  • 2 - 15oz. cans chickpeas, drained and rinsed
  • salt and pepper to taste

Roast the red peppers:  preheat the oven to 425 degrees Fahrenheit.  Cut the peppers in half lengthwise, remove the seeds, coat lightly with a total of about a teaspoon of olive oil, place on a lightly greased baking sheet, and roast for about 22 minutes until the skin is dark in spots.  You could also buy roasted red peppers.  (In that case, you would only need a total of 3 tablespoons olive oil for the recipe.)
Grind the almonds into a fine powder using a food processor and set aside.    
Puree the tomatoes and roasted red peppers until smooth, working in multiple batches if necessary.  Set aside.
Heat 3 tablespoons of olive oil in a medium saucepan over medium-high heat.  Add the garlic, shallots, and jalapeno and sauté until the shallots begin to turn golden brown, about 5 minutes.  Pour in the vegetable broth, stir, and heat for another minute.  Add the tomato/pepper puree, vinegar, sugar, thyme, and rosemary and heat until just boiling.  Then simmer at medium-low heat for about 10 minutes, stirring occasionally.
Add the almonds and chickpeas.  Simmer the mixture, uncovered, for about 25 minutes until the sauce has reduced a bit.  Season to taste with salt and pepper.  Serve.

We ate the chickpeas over brown rice.

Comments:

There are a couple important, "secret" ingredients in this dish: roasted red peppers and almonds.   The roasted red peppers really make the dish, adding a smoky flavor to the sauce.  The almonds thicken up the sauce and add substance.  The result is a hearty, savory, saucy mixture  The dish definitely isn't one of the most exciting or complex dishes in existence, but it does provide a filling, tasty, low-fat meal.

Friday, November 25, 2011

Mint Chocolate Chip Cake

Happy Birthday David!  My brother turns 25 this week so he and his girlfriend were home to celebrate today.  I made his birthday cake at the last minute.  Here's what I made:

Recipe:
Mint Chocolate Chip Cake

Chocolate Chip Cake:
  • 1.5 cups flour
  • 3/4 cup sugar
  • 1/2 teaspoon salt
  • 1 teaspoon baking soda
  • 1/4 cup cocoa powder
  • 1.5 teaspoons vanilla extract
  • 1/3 cup canola oil
  • 1 tablespoon white vinegar
  • 1 cup cold water
  • 8oz. (2/3 bag) vegan chocolate chips (I use Ghirardelli semi-sweet chips)

First, preheat the oven to 350 degrees Fahrenheit.  Lightly grease a round 9-inch cake pan or muffin tins, and set aside. 

Combine the dry ingredients in a large mixing bowl.  Create a well in the center of the dry mixture and add the wet ingredients.  Mix until just combined.  Then, mix in the chocolate chips. 

Pour the batter into the prepared pan.  Bake for 30 minutes or until a toothpick inserted into the center of the cake comes out clean.  (Check cupcakes after about 15 minutes.)  Allow the cake to cool in the pan on a wire rack. 

Yield: one 9-inch cake.  (Note: If you're making a layer cake, double the recipe.)

Chocolate-Mint Frosting:

  • 1/2 cup vegan margarine
  • 3 cups powdered sugar
  • 1/3 cup cocoa powder
  • 1.5 teaspoons peppermint extract
  • 3-4 tablespoons water or soymilk

Cream the margarine in a stand mixer until smooth.  Add the powdered sugar and cream for 2 minutes.  Add the rest of the ingredients and mix on high until well combined and smooth (about 3 minutes).  Once the cake is cool, frost and enjoy!

Comments:
This cake has a lot going for it.  The chocolate chips provide extra-chocolatey bites throughout the cake and the chocolate-mint frosting has a really fresh taste.  The cake tastes (and looks) a lot like a Thin Mint--remember those Girl Scout cookies? 

The cake was a hit.  David thought it was one of the best vegan baked goods I've served him--very exciting!  He thought it was a satisfying dessert.  The cake was about room temperature when we ate it, but it's also great a day later once it has been refrigerated.  I am generally partial to day-old cake so I'm looking forward to the leftovers.

Sautéd Spinach and Tomatoes

Happy Thanksgiving!  I hope everyone had delicious meals yesterday.  I actually had two Thanksgiving meals: lunch with my extended family at my grandmother's farm in Pennsylvania and dinner with Simon's family.  What could be better?

My family's Thanksgiving meal is always organized as a pot-luck.  I was in charge of bringing a green vegetable, so I made sautéd spinach and tomatoes.  Everyone loved the dish, so it's definitely worth a try! 

Recipe:
Sautéd Spinach and Tomatoes

  •  1 bunch spinach (about 6 cups loosely packed)
  • 2 tablespoons olive oil
  • 1 onion, chopped finely
  • 3 garlic cloves
  • 1/4-1/3 cup pine nuts, toasted
  • 1/2 teaspoon salt
  • 2 plum tomatoes, cut into pieces a little smaller than a 1/2 inch dice
  • juice of a half lemon

Preheat the oil in a large skillet over medium-high heat.  Sauté the onions and garlic for 3 minutes and add the salt.  Add the tomatoes and continue sautéing until the moisture from the tomatoes begins to release.  Add the spinach and cook until wilted.  (If the mixture dries up too quickly, add splashes of water to keep everything from burning).  Remove from heat, sprinkle with lemon juice, and serve.
Serves four.  

Comments:
The pine nuts are a really nice addition to this simple spinach dish.  They add a toasty flavor and a nice crunch.  Pine nuts are usually pretty pricey, though, so feel free to leave them out if you'd like.

As I mentioned above, this dish was quite popular among my extended family; I received numerous compliments.  Nobody in my extended family is vegetarian--let along vegan--so I assure you that non-vegans will love this dish.  It would also be great at a Christmas meal since it's red and green!  

What tasty vegan dishes did you make for Thanksgiving?  Comment below if you'd care to share.

Monday, November 21, 2011

Lentil Veggieballs

In the spirit of Thanksgiving, I decided to try a recipe from the New York Times' Well's Vegetarian Thanksgiving recipe series tonight.  (There are a ton of good recipes on the site.  I'd definitely recommend checking it out!)  I made the lentil veggieballs--also known as a vegan version of meatballs.  Follow this link to the original recipe for the balls: http://www.nytimes.com/interactive/2011/11/01/health/20111101_vegetarian_thanksgiving.html#Veggie_Balls, though I'll paste it below in order to include my own additions and veganizations.
  
Recipe:  
Lentil Veggieballs
  • 2 cups lentils
  • 1/4 cup plus 2 tablespoons olive oil
  • 1 large onion, chopped
  • 2 carrots, chopped
  • 2 celery stalks, chopped
  • 1 garlic clove, minced
  • 1 tablespoon chopped fresh thyme (or 1 teaspoon dried thyme)
  • 2 teaspoons salt
  • 3 tablespoons tomato paste
  • 8 ounces button mushrooms, wiped clean and sliced (or, if you can't find button mushrooms, use another variety of small, white mushrooms)
  • The equivalent of 3 eggs (I used Ener-G Egg Replacer powder)
  • 1 cup bread crumbs
  • 1/2 cup chopped fresh parsley
  • 1/4 cup finely chopped walnuts

1. Combine the lentils and 2 quarts water in a medium stockpot and bring to a boil. Reduce the heat to low and simmer until the lentils are soft but not falling apart, about 25 minutes. Drain the lentils and allow to cool.
2. Add 1/4 cup of the olive oil to a large frying pan and sauté the onions, carrots, celery, garlic, thyme and salt over medium-high heat, stirring frequently, for about 10 minutes, until the vegetables are tender and just beginning to brown. Add the tomato paste and continue to cook, stirring constantly, for 3 minutes. Add the mushrooms and cook, stirring frequently until all the liquid is absorbed. Transfer the mixture to a large bowl and allow to cool to room temperature.
3. Add the egg-equivalents, bread crumbs, parsley, walnuts, and cooked lentils to the cooled vegetables and mix by hand until thoroughly incorporated. Place in the refrigerator for 25 minutes.
4. Preheat oven to 400 degrees Fahrenheit. Drizzle the remaining 2 tablespoons olive oil into a 9- x 13-inch baking dish and use your hand to evenly coat the entire surface.
5. Roll the lentil-veggie mixture into round, 1.5 inch balls, making sure to pack the mixture firmly. Place the balls in the prepared baking dish, allowing 1/4-inch of space between the balls.
6. Roast for 30 minutes, or until the meatballs are firm and cooked through. Allow the meatballs to cool for 5 minutes in the baking dish before serving.

Yield: About 2 dozen 1.5-inch meatballs.

Comments:

The bad news is that this recipe proves my mom right when she says that vegan cooking is labor-intensive.  It definitely took over 2 hours to make the balls from start to finish.  Even though some of that time was down time (cooking the lentils, baking the balls), there was still a lot of chopping involved.  Rachel went out to dinner tonight and Simon worked pretty late, but luckily Rachel arrived home in time to help me out!    

The good news is that this recipe proves me right when I say that vegan cooking is extra nutritious.  These balls replace red meat with a hearty combination of protein-heavy lentils and walnuts along with plenty of vegetable nutrition.  I definitely felt satisfied eating them.

Simon and I ate them as lentil veggieball subs tonight, meaning we put the balls on rolls and topped with tomato sauce.  In my opinion, the lentil veggieballs were pretty good.  Not great, but I'm glad to have tried them and I enjoyed eating them.  They're not very crispy or firm--as I remember meatballs being--but they have a good flavor.  Simon's non-vegan opinion was that they were okay, but he thought they taste more like baked falafel than meatballs.  (Still, he did have seconds.)   

We made extra lentil veggieballs so we can have whole wheat spaghetti and lentil veggieballs tomorrow night.  We plan to make the Well's spinach-basil pesto tomorrow night to go with the spaghetti, so here's the recipe for that:  http://www.nytimes.com/interactive/2011/11/01/health/20111101_vegetarian_thanksgiving.html#Spinach-Basil_Pesto.  I'll let you all know how the pesto ends up tasting tomorrow night!
Friday, November 18, 2011

(Mostly) Homemade Pizza

Another night, another dinner.  We made pizza tonight.  It was definitely nice to eat something hot out of the oven in contrast to the freezing weather outside!  We used store-bought, refrigerated pizza dough (it comes in one of those awesome tubes that you sort of peel open until it POPs).  We divided the pizza into three sections (one for each of us): my pizza was veggie + vegan sausage; Simon's was veggie + vegan sausage + mozzarella cheese; Rachel's was veggie + cheese.  I'll list all of the ingredients that were involved, but note that they weren't all consumed by all of us.

Recipe:
Vegan Pizza

  • 1 package of refrigerated pizza dough; or, make your own!
  • olive oil for sautéing
  • 1 clove garlic, minced
  • 1 yellow onion, diced
  • 1 bell pepper, diced
  • 1 can of diced tomatoes (or tomato sauce, if you like things less chunky)
  • Other assorted vegetable toppings--mushrooms, olives, broccoli, etc.
  • 1 tube of Gimme Lean vegan sausage, cut up into bite-sized pieces
  • spices (garlic powder, basil, oregano, red pepper flakes, etc.) to sprinkle over the top before or after baking
Preheat the oven to 400 degrees Fahrenheit.  Spread the pizza dough on a cookie sheet and pre-bake it for five minutes before putting the sauce and toppings on it.  In the meantime, heat up the oil and garlic in a medium-sized pan (I always heat  garlic along with the oil instead of adding it later--that way, the garlic heats up slowly instead of scorching when added to hot oil).  Add the onion, bell pepper, and other vegetables (if desired) and sauté until everything gets tender and even starts to brown a little bit.  (This isn't a necessary step, but the end result will be tastier if you sauté things first!)  Add the diced tomatoes to complete the sauce mixture.  Once the crust is ready, spread the sauce mixture over the crust, sprinkle the veggie toppings and sausage on top, and add any spices you plan to use.  Bake for about 9-12 minutes. 

Comments:
This recipe is great for a couple reasons.  First, vegan pizza is definitely healthier (lower-fat) than cheesy pizza, but it's still very satisfying--yes, even without the cheese.  Second, it's great for a vegan/non-vegan group because it's so customizable.

Some people might be suspicious of the vegan sausage, and I don't blame you.  More often than not, I'm very suspicious of meat and dairy substitutes.  For instance, you'll notice that I didn't put any vegan cheese on the pizza.  To me, it's better without.  But, I love vegan sausage.  There's just something about the spices used in it that is actually gustatorily pleasing.  Simon also likes the sausage and chose to put it on his pizza, though Rachel didn't have any.  But again, that's the beauty of pizza!  Anyone can put anything on it.

Thursday, November 17, 2011

Fudgy Brownies

I love brownies.  There are few things better than fudgy, chocolatey squares, and vegan brownies take on those characteristics quite well.  Here's the recipe I usually use:

Recipe:
Fudgy Brownies
  • 2 cups sugar
  • 2 cups all-purpose flour
  • 3/4 cup cocoa powder
  • 1 teaspoon baking powder
  • 1 teaspoon salt
  • 1 cup water
  • 1 cup canola oil
  • 1 teaspoon vanilla extract
  • 12 oz. bag of vegan chocolate chips (I use Ghirardelli semi-sweet chips)
Preheat the oven to 350 degrees Fahrenheit.  Stir together the first five ingredients in a large bowl.  Form a well in the center of the dry mixture and pour in the wet ingredients.  Mix until combined and then mix in the chocolate chips, but do not over-mix.  Pour into a lightly greased 9x13 inch baking pan and spread evenly.  Bake for about 25-30 minutes, or until a toothpick/knife inserted in the center comes out (fairly) clean and the top is no longer shiny.  

Comments:
As I stated above, I love these brownies.  This is my go-to recipe.  They're really easy to make, especially since there's not a hard-to-find egg replacer involved; the oil takes care of that.  The addition of chocolate chips provides a little extra something when you bite in, too.  They're great right out of the oven, but really, I like them best after they've been refrigerated for a while (and so does Rachel).

Simon and I made these brownies yesterday (Rachel left us alone for no more than 25 minutes when she went to the library, and we couldn't help ourselves).  But, we decided to try out a lower-oil version of the recipe.  We used only 1/2 cup oil and added about 2 tablespoons of unsweetened apple sauce.  The brownies came out well: they were a little more cake-like, but today -- one day later, post-refrigeration -- they're actually pretty fudgy and much denser.  Next time, I might try adding a little more applesauce.  I'll let you know how it goes!

So, how do Rachel and Simon feel about these dairy-free brownies?  Rachel likes the chocolate chips a lot--she likes the variety in texture that they provide--and says the brownies are "absolutely as good as non-vegan brownies."  Score.  Simon must feel the same way, since he's the one who instigated the brownie-making yesterday.   

Enjoy!

Wednesday, November 16, 2011

Tofu and vegetable stir fry with peanut sauce

Dinner on Monday: stir fry.  The beauty of stir fry is that it doesn't require precision (at least, in my experience).  I'll list the recipe below, but you can really use any vegetables or other ingredients you like.

Recipe:
Stir Fry with Peanut Sauce
  • 1/2 cup peanut butter
  • 1/2 cup oil (I used canola oil because that's what we had; but, sesame oil would be best)
  • 2 tablespoons soy sauce (we used low-sodium soy sauce)
  • 2 talbespoons water
  • 1/4+ teaspoons cayenne pepper
  • Assorted vegetables--we used a bag of frozen "stir fry vegetables," including snap peas, broccoli, carrots, water chestnuts, red pepper, and more.
  • One package extra-firm tofu, pressed and cubed
Whisk together the first 5 ingredients to create the peanut sauce.  Set aside.
In a large skillet, heat up a small amount of oil over medium-high heat.  Add the tofu and brown it by letting it rest on each side for a few minutes.
Once the tofu looks generally golden brown, add the vegetables.  Heat until warm.
Add the peanut sauce, and heat until warm.

Rice:
Meanwhile, prepare rice according to the package instructions.  We used brown rice.

Once the rice and stir fry are both ready, serve together.  We also splurged at the grocery store and bought spring rolls, which are always great.  Mmm.

Comments:
Rachel really liked the stir fry and hopes we make it again.  She also enjoyed the spring rolls, but none of us can take any credit for that :) 

Simon thought using frozen vegetables was a good way to get a variety of vegetables (spoken by someone who likes a frustratingly low number of vegetables...).  He gave dinner 7 thumbs up.

I thought it was very good and very filling.  I'm traditionally not a huge fan of tofu--I wouldn't choose it over some other meat substitutes--but I enjoyed it here.  Browning it is key.  The major benefit of this recipe is that it's quick and low-maintenance (especially when using frozen vegetables).  My mom has noted in the past that vegan cooking requires a lot of prep work, but this recipe is an exception. 

About this blog

Hi everyone!  Welcome to my blog.  I'd like to use my inaugural blog post to give you all some background on my blog and let you know what to expect.

My name is Carol and I've been vegan for just over four years.  My family--including my dad, my mom, my brothers Michael and David, and my sister Emily--has been quite supportive of my vegan diet.  However, I recently moved just outside of Washington, D.C. and I now live with my boyfriend Simon and my good friend Rachel.  We eat most of our dinners together, which has been great.  But, there's one catch: Rachel and Simon are non-vegan, and, in fact, they both like meat.  Thankfully, they're both willing to be "vegan after 6pm," as Rachel says--in other words, we cook vegan meals for dinner.  Sometimes they'll add some cheese or sour cream to a meal, but hey, we're not all vegan.  Dinner is.   

I hope to use this blog to record what we eat for dinner and our reactions to those meals and recipes.  I want to create a resource for anyone looking to cook a vegan meal or bake a delicious vegan dessert.  You're in the right place if you have any interest in veganism or vegan cooking/baking.  You're REALLY in the right place if you are a vegan who lives with or cooks for non-vegans, like I do.

Finally, I'd just like to thank Emily for pushing me to blog!  We'll see how it goes.